Schema
Schemas are the skeleton of the Woopra project. Schemas are declarations of metadata about an event or user property. They define how the data tracked is read and processed by Woopra. The Schema configuration for all event and user data tells Woopra what type of data it is, how the user wants it to be displayed, and how it can be aggregated.
Editing a Schema will NOT affect the actual tracking.Editing Schemas will only change how Woopra reads and understands the data that's being sent as well as how the data is displayed. Editing Schemas will not affect the data that is sent.
DO NOT change the KEY valueEditing schemas will not affect the tracking, however, if you are not the developer who implemented the code on your site, we recommend you do not change the Key value.
Please use caution if changing the Key value if you do not understand what this is. Changing this value can result in duplicate events in your Schemas.
The type and aggregation set for each property will be leveraged for smart filtering and richer analytics throughout Woopra. Basic Schemas are automatically created from any custom event and user properties being tracked, or Integrations Apps’ events that are selected from the configuration. Once added, they should be configured as desired by the user who set up the tracking code.
To access the Schema editor, you must be an Administrator. Click on the “Configure” button in the navigation bar and find Event and User Schemas under the Manage section of the sidebar.
There are two types of Schema:
- User Schema
- Event Schema
Schemas can be found in the Configure section of the Woopra Dashboard.
User Schema
User Schema defines the custom user properties that are being tracked. The name, email, and company name are added to the User Data Schema by default, but Woopra will also add Schema for the other custom user data (https://docs.woopra.com/docs/custom-actions-and-visitor-data) that the script is calling. To learn more about how to identify your user and track custom user data, please read the Javascript tracking tutorial.
For each Schema, define the title, description, key, type, and aggregation:
Please note, Schemas are character sensitive. We accept upper/lower case letters, numbers, underscore, dashes, as well as spaces.
Schema Property | Description |
|---|---|
Title | The User Property title as seen throughout Woopra. This helps users understand the property being tracked, even if they did not participate in the setup. e.g. User ID. |
Description | The description is an important reference for the entire team to understand the meaning of the user property, especially those who did not participate in the tracking code setup. It’s always a good practice to add a description to fields to make it easy for other users to take event on this data. |
Key | The key name as tracked on the website. This comes directly from the tracking code. e.g. company size. |
Type | Type of property:
|
Aggregation | Specify whether the property is a unique value (A property wished to be tracked, but do not wish to visualize graphically e.g. account_id), amount (e.g. monetary value), or group (value that could be shared with other customers and that is wanted to be seen in a report e.g. trial, package, etc.). |
Event Schema
The Event Schema is different from the User Schema. It defines the events from the installed Integrations Apps or the events that were set up for tracking and any properties associated with those events. Each company has its own key events that need to be tracked.
For an e-commerce website, they may want to track product views, cart updates, and purchases, while a SaaS business may want to track form submissions, signups, trial engagement, conversions, etc. To learn more about how to track custom event, please read the [Javascript tracking tutorial] (https://dash.readme.io/project/woopra/refs/intro-javscript-sdk).
The Event Schema configuration will fine tune the look and feel of Woopra for the company. Woopra will use the Schema to build the content of the customer Profiles (For example, instead of “User did event payment”, it would say “Jim purchased the Yearly Small Business package for $1,999.50“) and more.
Event Info
Each event consists of four parts to be configured:
Title | The event name as seen throughout Woopra. This helps users understand the event being tracked, even if they did not participate in the setup. Administrators can associate an icon with the event that is being tracked. |
Description | The description is an important reference for the entire team to understand the meaning of this event, especially those who did not participate in the tracking code setup. It’s always a good practice to add a description to fields to make it easy for other agents to act on this data. |
Key | The name of the event as it’s tracked e.g payment. We recommend you not change this value unless you understand how the events are being sent. If you're unsure, only change the Title value. |
Event Types Active/Passive | In Users Profiles, you can choose to show Active and/or Passive event only. Active: This event is sent as a result of direct user event. Passive: This event is sent as part of a background process or tracked on a user's behalf. |
Event Properties
Each property will have the below fields:
Key | The name of the property as it’s tracked e.g. amount. |
Type | Types of the properties:
|
Aggregation | Specify whether the property is a unique value, amount, or group. |
Aggregations
Group | Used for properties that can be applied to multiple events or users, such as company, product, or credit card type. |
Unique | Used for properties that are a unique identifier for a specific event, such as a receipt ID or a transaction ID. For users, a username or email address would be a unique identifier, while company would be a “group” as it can be applied to more than one user. |
Amount | Used for properties that can be added up or summed. When you designate a property as “amount”, you will be able to sum it in your segmentation filters (https://docs.woopra.com/docs/segmentation-filters) and analytics reports. |
Buckets
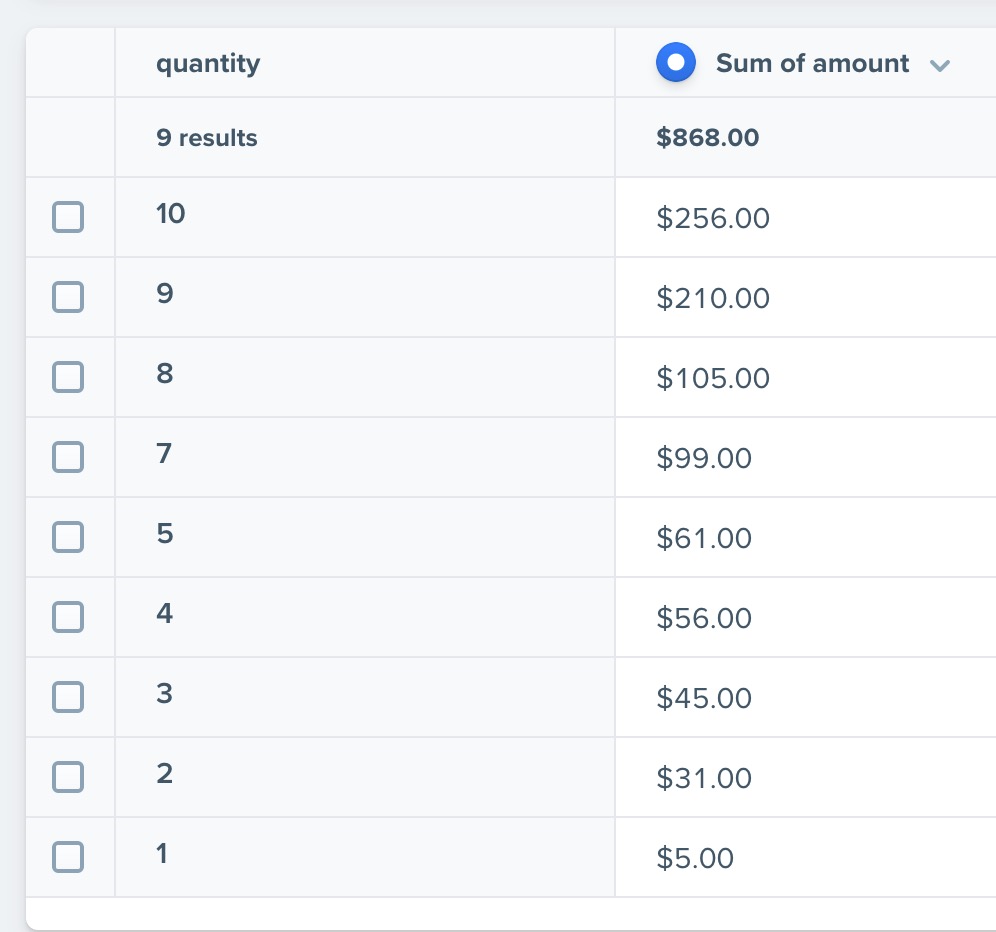
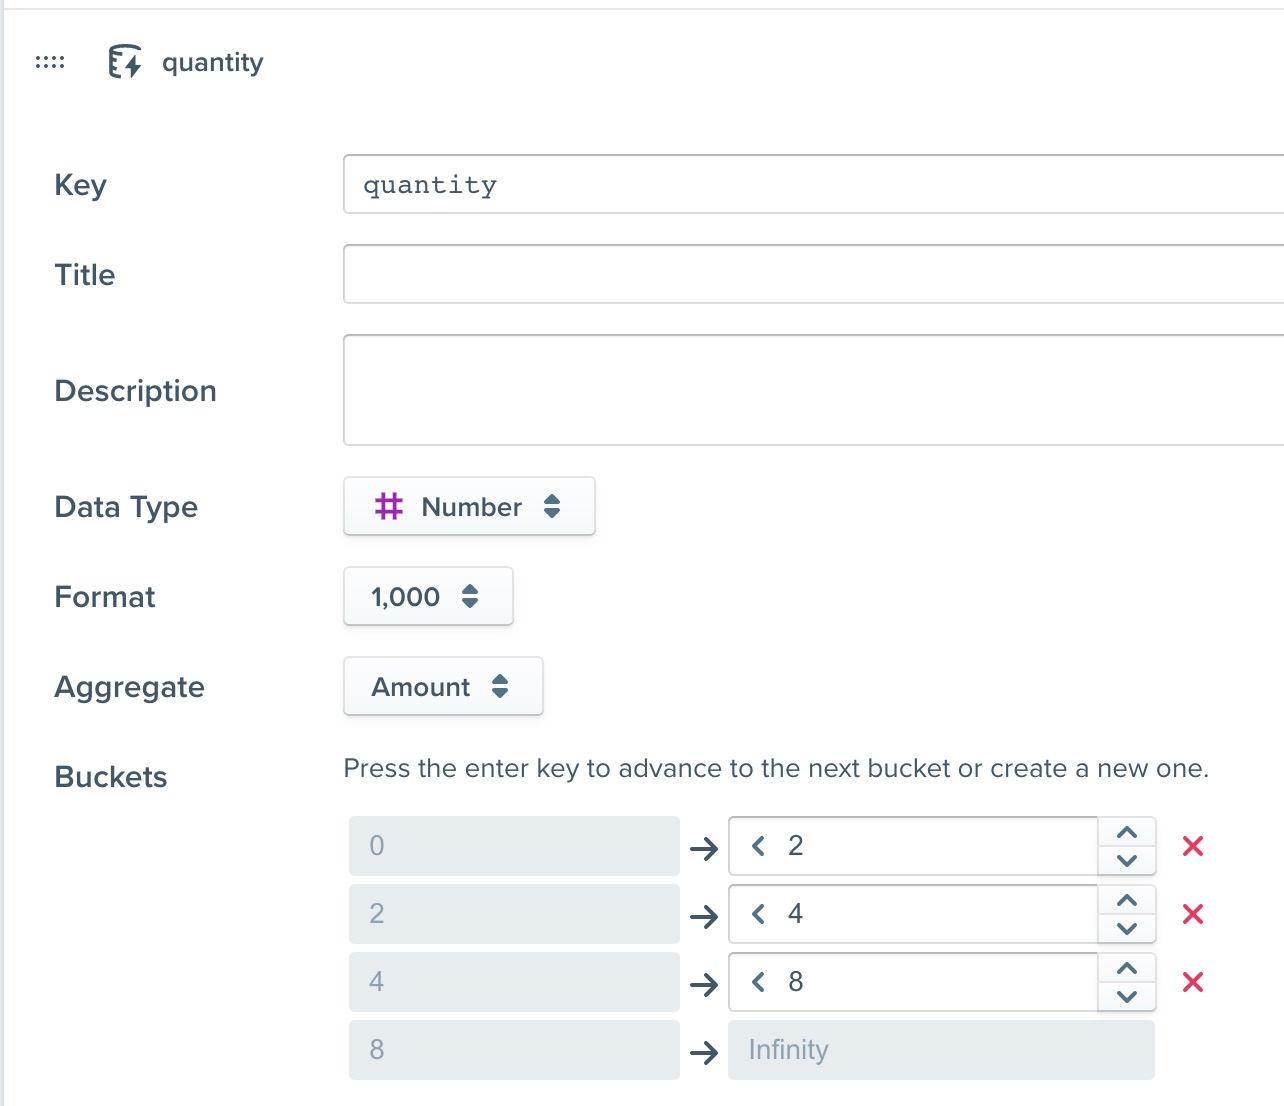
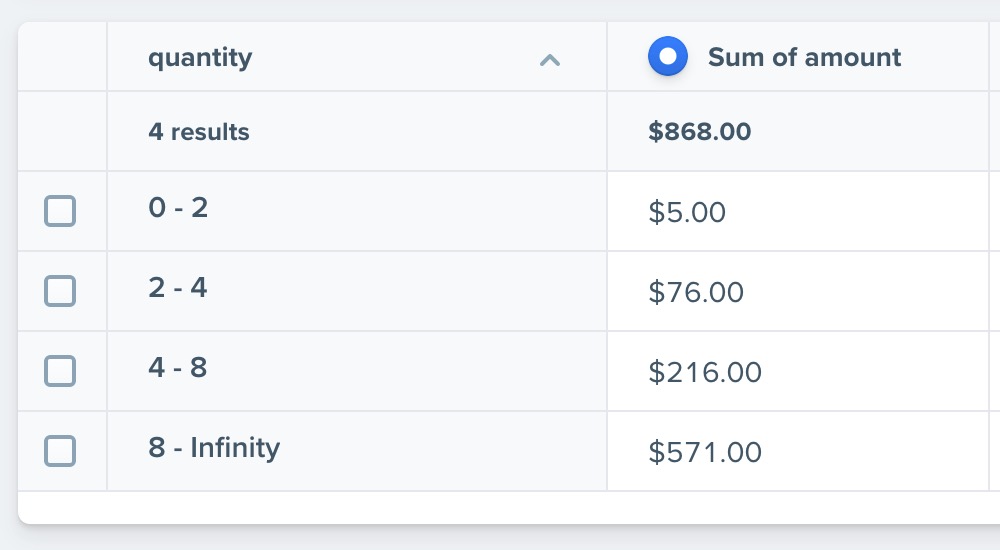
Buckets can be used to group 'number' types for use in Trend reports. For example, say a user can purchase different quantities of items from your store. When running a Trend report, if you 'Compare By' the quantity without any buckets, each row in the quantity column will be a specific quantity for each purchase:

You can group these quantities in the schema using buckets:

Now when you run the report, the quantities will be bucketed:

Schema Auto-Generation
When a new event without a schema comes into Woopra, the system will create a basic schema so that the event can be found in reports and searched for in the Woopra interface. Users can then edit this schema in the schemas section to give some items a more sensical value that the computer cannot auto-generate such as Display Name, and Template.
![[9a21b9b33e5fdbd6062682e6b4eef4fb]_Image 2019-04-24 at 3.20.54 PM.png 1312](https://files.readme.io/64da1ae-9a21b9b33e5fdbd6062682e6b4eef4fb_Image_2019-04-24_at_3.20.54_PM.png)
New events sent to Woopra will be indicated by the pink notifications. These are meant to remind you to review the new events to make sure the data types and templates are set up how you'd like.
If the event is already added to the schema, Woopra will not modify it if you start sending other properties. In other words, the new properties will not be automatically added to the existing Schema. To update the schema you will need to either delete it and wait for the event to be tracked again, or manually make the property modifications yourself. Note that deleting a Schema will not delete any existing data that has been collected.
Auto-Generated CharactersFor Schemas to be auto-generated, the allowed characters are -- lower case letters, numbers, underscore, dashes, and spaces.
Event Templates (found in both Event and User Schemas)
The template is how the event is displayed when it occurs in a timeline or event history. It allows the user to use event properties in a sentence about that event when it occurs. For instance, the email_open event may have a title, "Email Opened", and a template of "Opened email with subject: ${actions.subject}".
See Woopra Templates for more on how to create your own templates.
![[31259427b27097077854b08ce1a359c6]_Image 2019-04-24 at 2.52.11 PM.png 2392](https://files.readme.io/2303cf8-31259427b27097077854b08ce1a359c6_Image_2019-04-24_at_2.52.11_PM.png)
Edit the Schema template to change how the event looks in the People Profiles.
![[804e84e175d0e2b48b75c745ee1d4562]_Image 2019-04-24 at 2.50.04 PM.png 1440](https://files.readme.io/b0fe825-804e84e175d0e2b48b75c745ee1d4562_Image_2019-04-24_at_2.50.04_PM.png)
How the events will look in the People Profiles.
Schema LimitsThe Woopra system puts limits on how many event and user properties can have schemas declared. Those limits are currently at 200 user property schemas, and 200 event schemas.
For the javascript formatting for your schema, you can reference here.
Updated 3 months ago
