
Shopify
How to use and install the Shopify integration
For some guided help connecting Shopify, please contact [email protected] and we'll gladly hop a call to walk you through the process.
The Woopra + Shopify Integration enables you to import order data for use in your customer analytics.
Since this integration uses our Dataloader connection, you can import historical data from Shopify. We also have access to certain tables in Shopify, where you can customize what data you want to import to Woopra.
This integration makes it easy to do reporting on revenue and sales. With the right setup, it’s possible to see your customer’s complete journey from marketing campaigns all the way to checking out.
Installation
As of August 13, 2024, Shopify will be sunsetting 'checkout.liquid'We have updated the following docs to use Shopify Pixels instead of 'checkout.liquid'.
This document may still need some updates but we have tested the following code and it's currently working as expected.
There are two parts to setting up Shopify tracking:
- Connect Shopify through our Data Loader to import historical and real-time order data. This data is pulled directly from Shopify's API.
- Add Woopra code to the Shopify Pixels to tie website browsing data with the imported order data. Since the order data is imported directly from Shopify's API, this creates a separate Woopra profile from a user's website tracked data profile(i.e a profile that includes events that include pageviews, button clicks, scroll depth, etc.) unless this "website profile" is identified. We can assure these two profiles will merge correctly by editing the code on your shop page to identify users when they check out. This way, you'll have a complete journey for your user, from site behavior to completed order.
1 - Data Loader Connection
Navigate to the integration section and search for Shopify. Click the Connect tab and create a new connection. You'll be prompted to enter your connection details.

The instructions to get the Token and Key:
- Log in to your Shopify from the admin page and go to Apps.
- Click Manage Private Apps.
- Click Create New Private App.
- In the Description section, enter the app name and contact email.
- In the Permissions section, choose the areas of your store you want to grant to your app. (The permissions required
- by our provider to use all the tables and views are: read_customers, write_customers, write_draft_orders,
- read_draft_orders, read_fulfillments, write_fulfillments, write_inventory, read_inventory,
- write_marketing_events, read_marketing_events, read_orders, write_orders, read_price_rules, write_price_rules, read_product_listings, write_product_listings, read_products, write_products, read_shopify_payments_payouts)
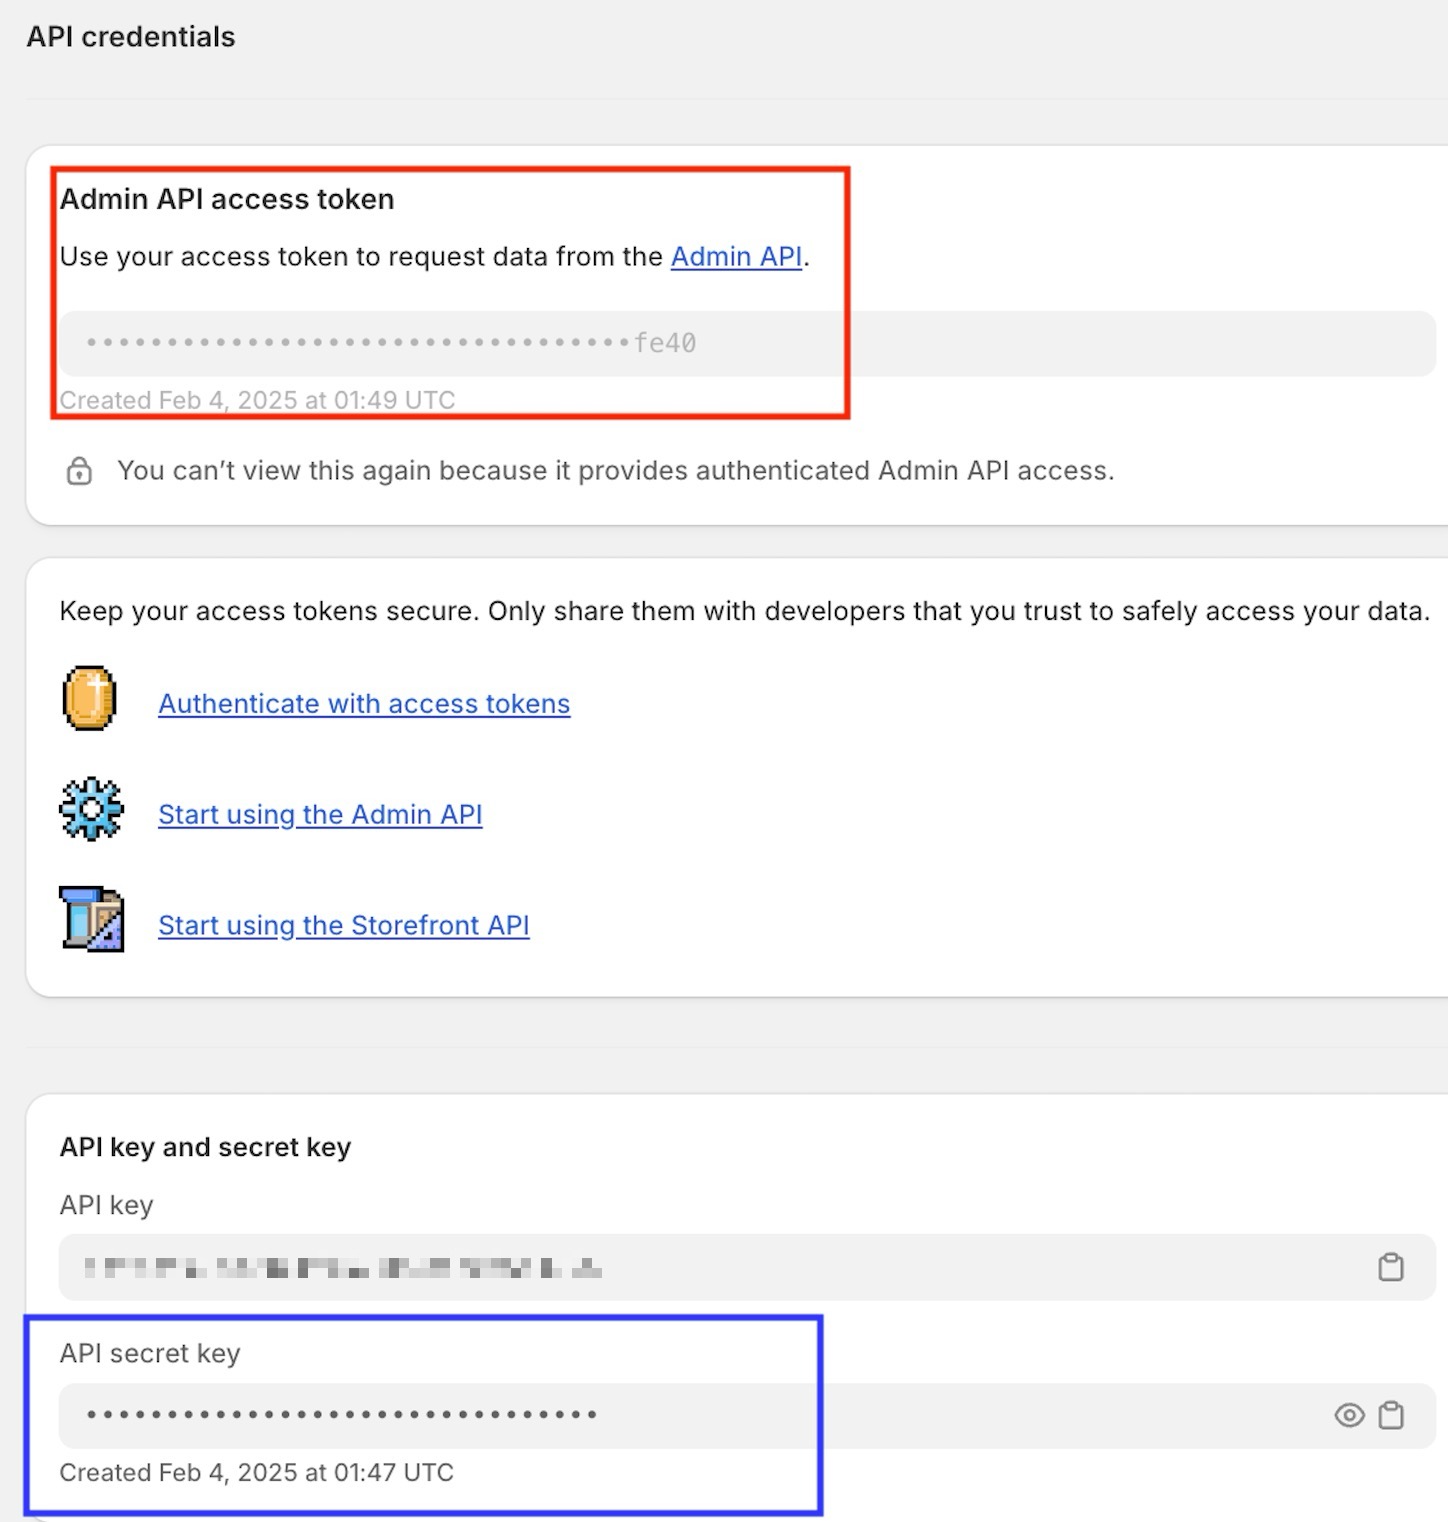
- Go back to your private apps. The API Key (App ID) of your application and its password (Password) are listed for the app.
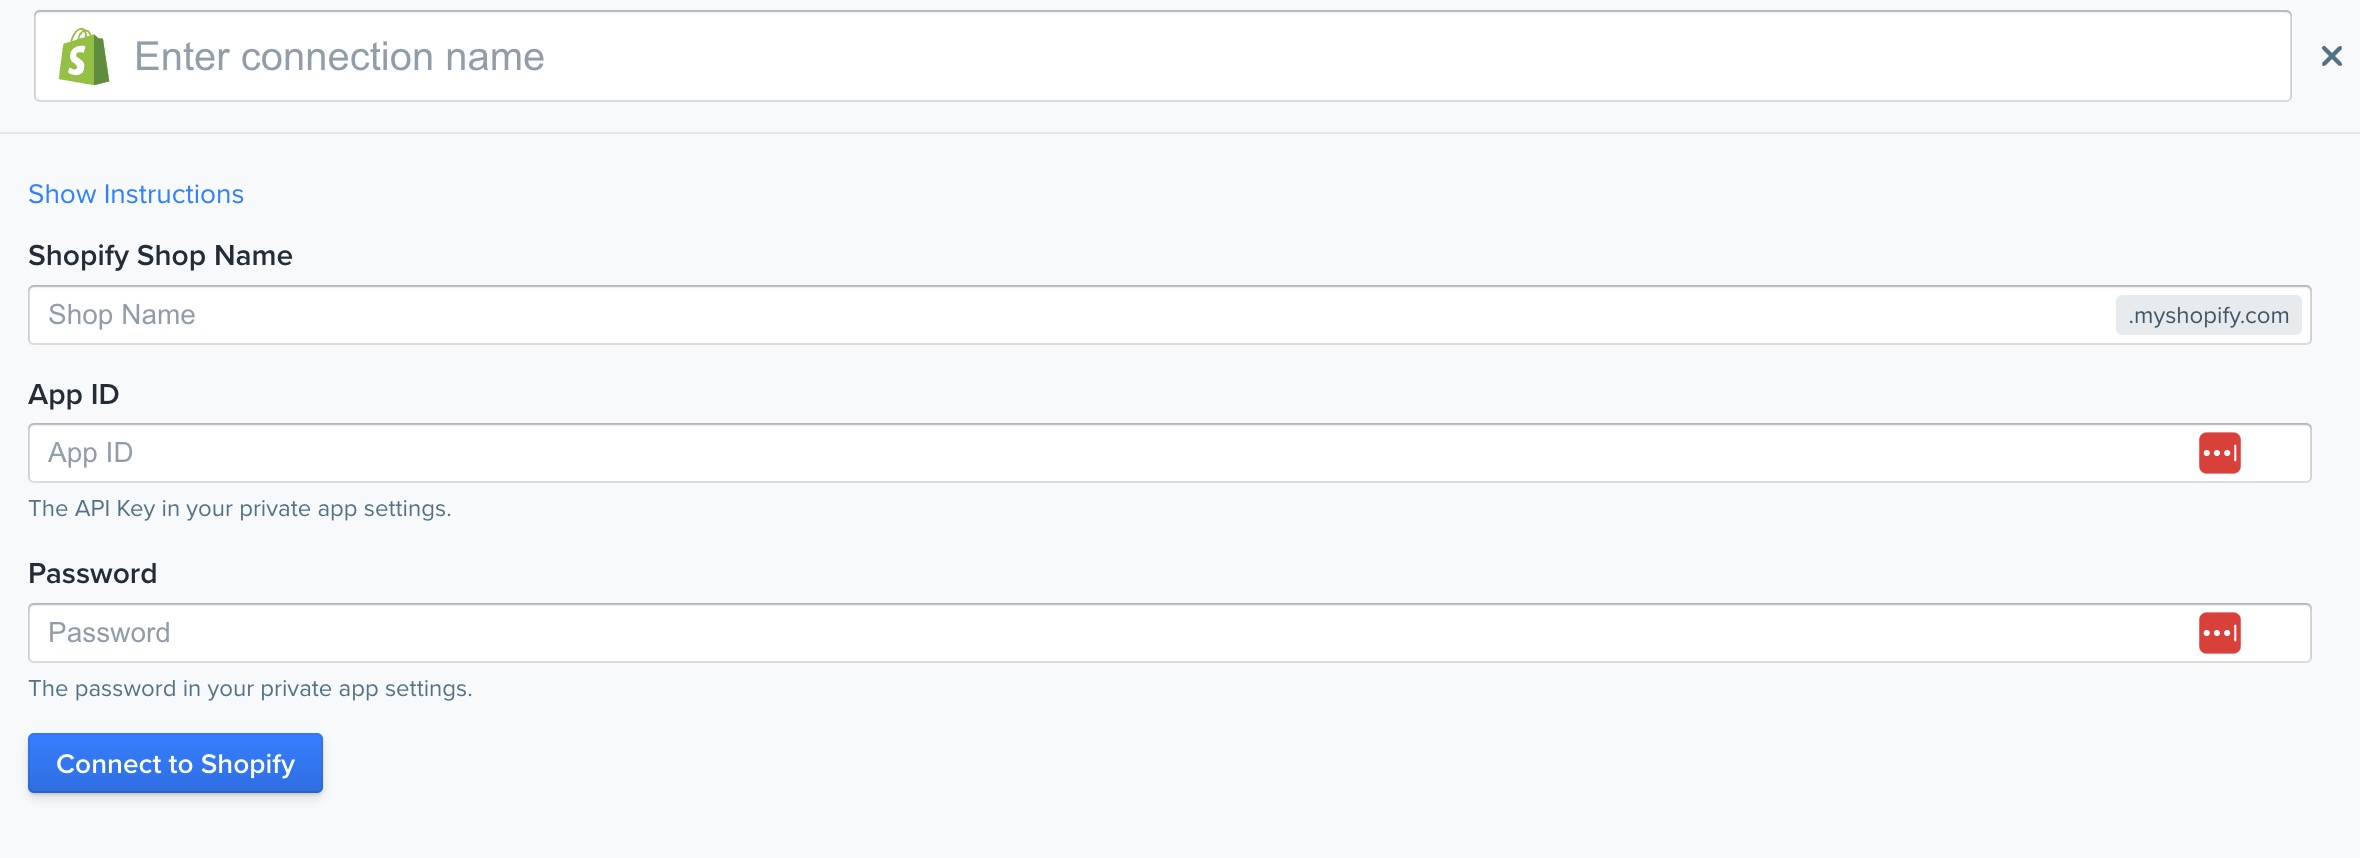
Please note that the 'App ID' is the 'API Key' (In Shopify) and the 'Password' is the 'Admin API access token' (In Shopify), which is in the red box and not the blue below.
2 - Editing the Shopify Code
Shopify Pixel Instructions
Navigate your Store's settings and click on Customer Events. Here, you can add custom pixels.
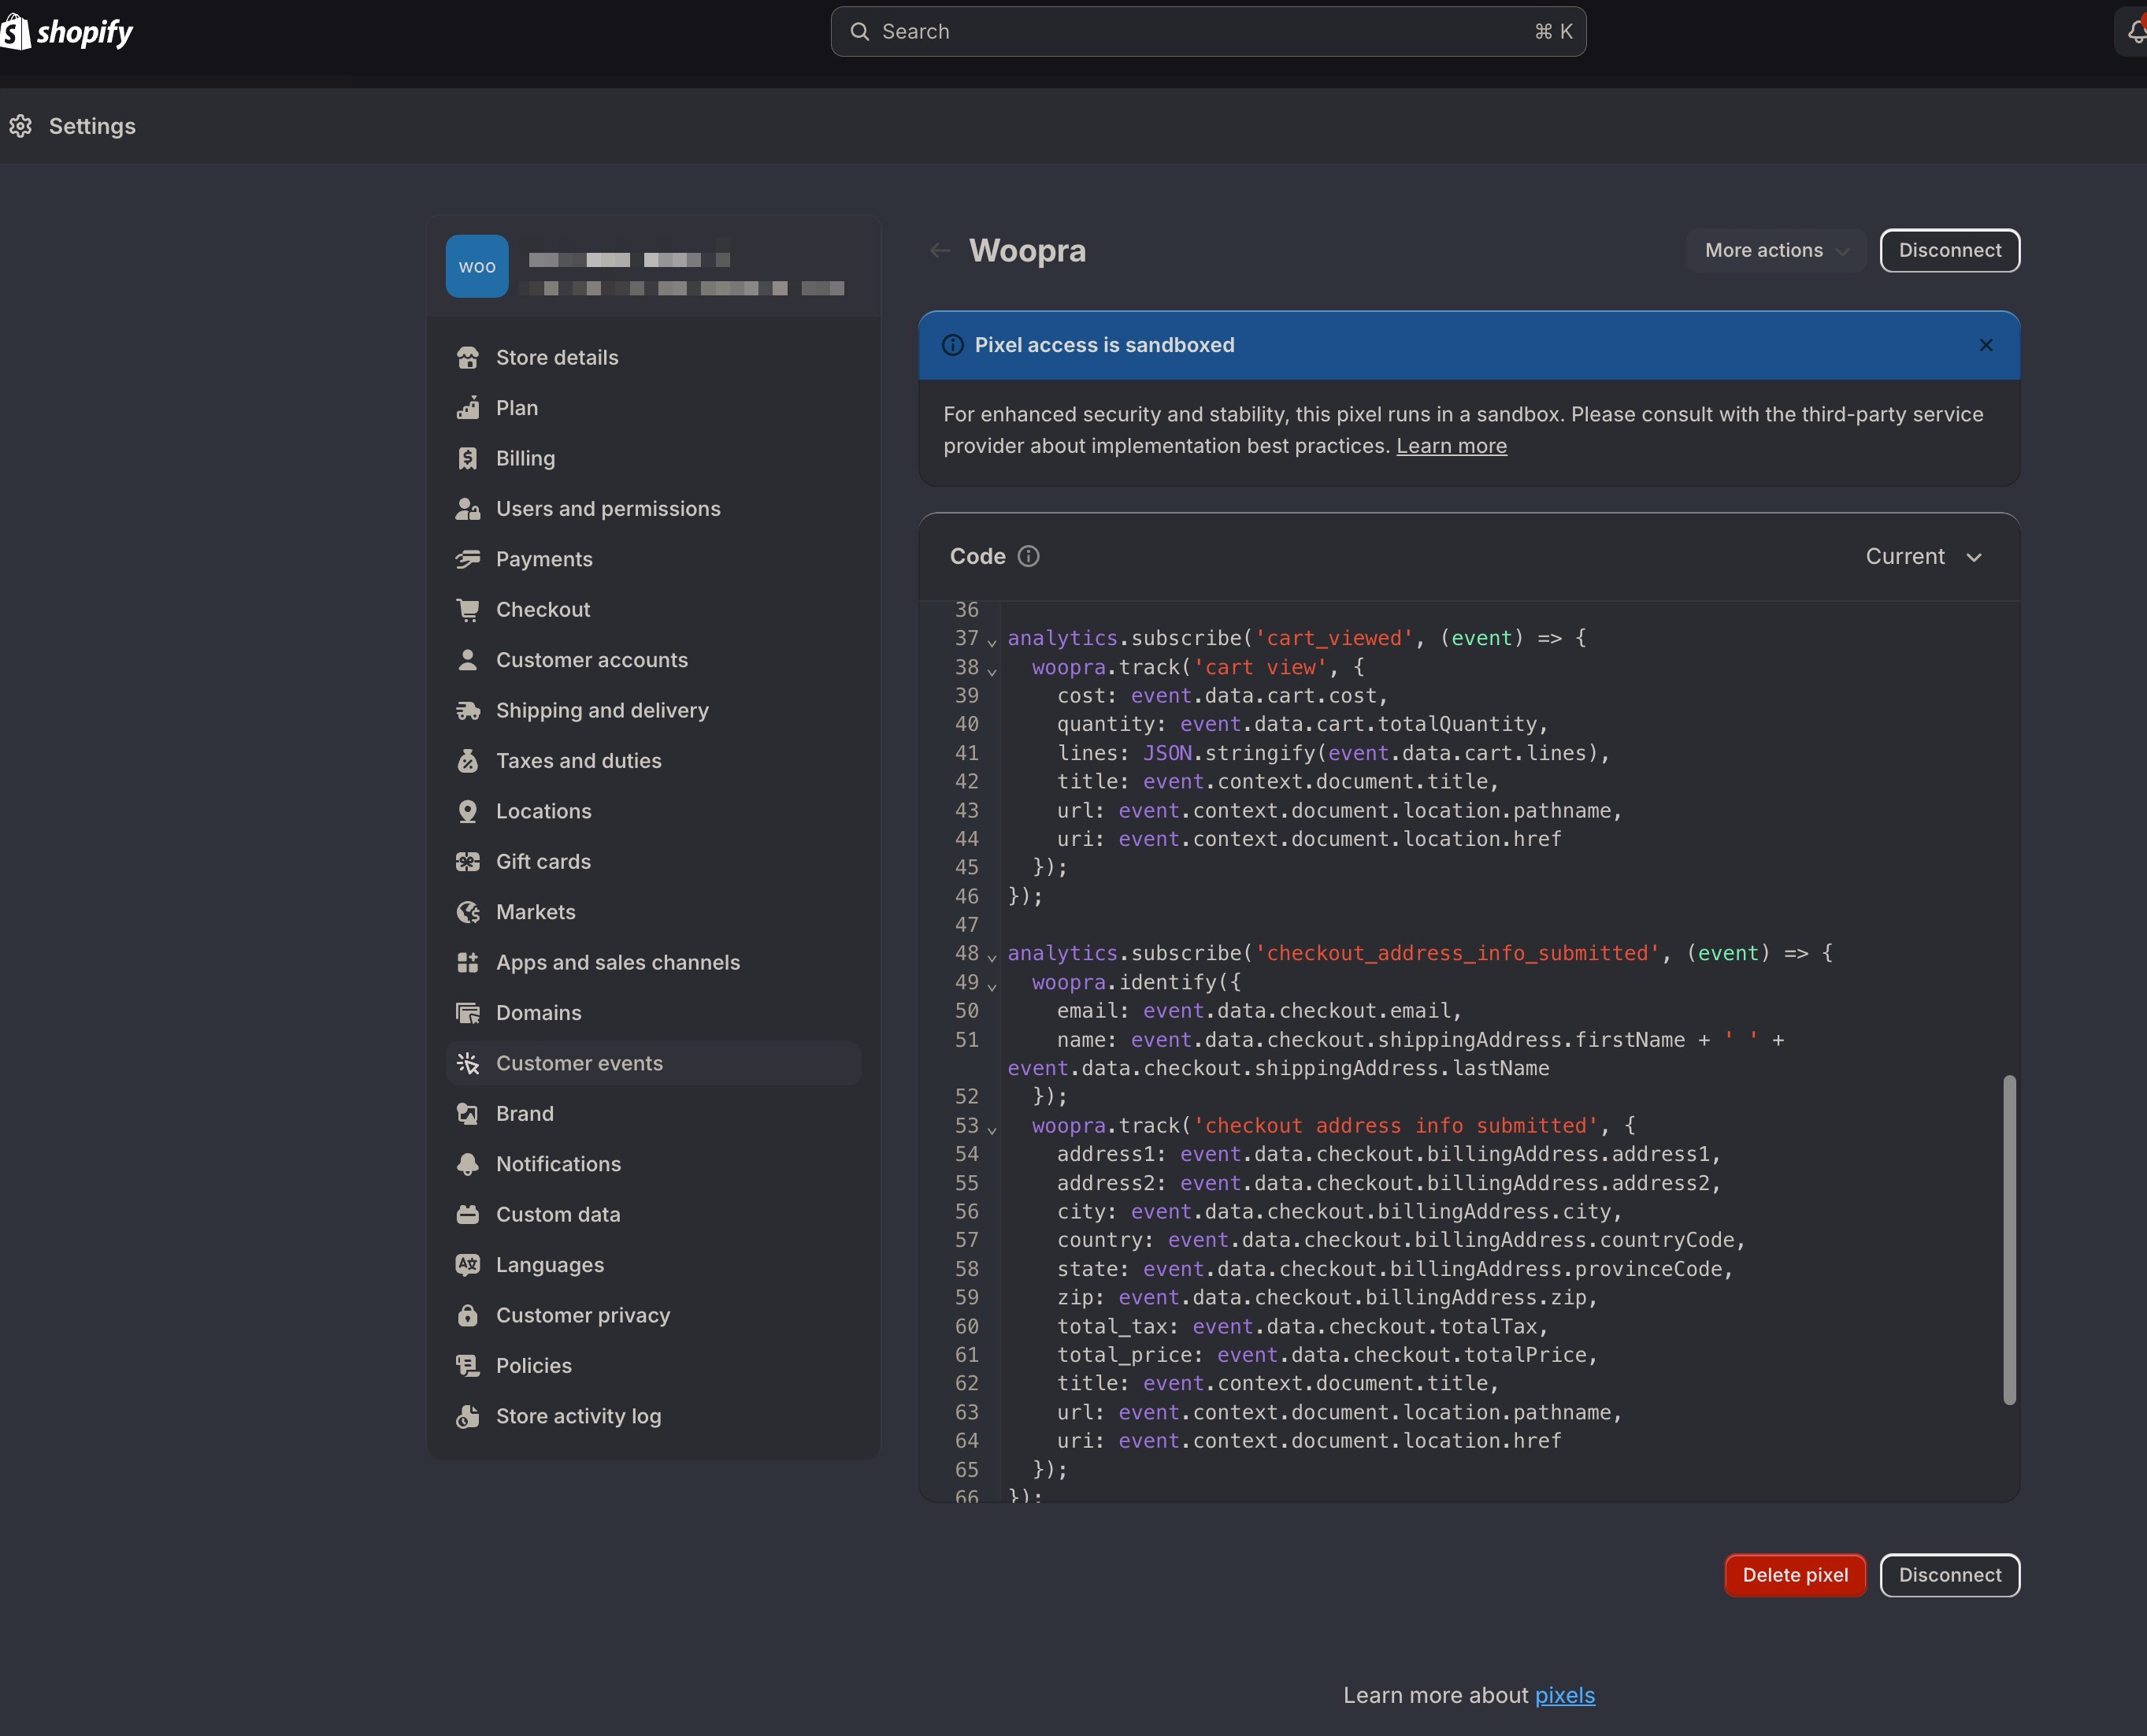
Next, you'll use the following code when creating a custom pixel:
If all of your pages are shopify pages, you only need to use the following code. You do not need to paste the base snippet elsewhere on the page since the following code includes the Woopra tracker. Otherwise, this could cause issues with split profiles.
Make sure you add your Woopra project name (domain) to the woopra.config part of the code. Also note, this is example code for most of the Shopify events. You can customize the code below to send additional Shopify events that are found HereOther considerations:
- The below code includes a pageview (pv)event. If you see duplicate pv events while testing, this may indicate that you have the pv event being tracked more than once, so you can remove the the tracker from other places you may have injected the snippet an only use the code below.
- Some events, such as the 'checkout_completed' event, may not work. This can depend on various factors such as the Shopify plan you're on, or if you're thank you or order status pages are still using checkout.liquid. In cases where you don't see this event, the Data Loader can import the checkout events. This is contingent on the customer's Email being captured during the 'checkout address info submitted' event.
It should be sufficient.
!function(){var t,o,c,e=window,n=document,r=arguments,a="script",i=["call","cancelAction","config","identify","push","track","trackClick","trackForm","update","visit"],s=function(){var t,o=this,c=function(t){o[t]=function(){return o._e.push([t].concat(Array.prototype.slice.call(arguments,0))),o}};for(o._e=[],t=0;t<i.length;t++)c(i[t])};for(e.__woo=e.__woo||{},t=0;t<r.length;t++)e.__woo[r[t]]=e[r[t]]=e[r[t]]||new s;(o=n.createElement(a)).async=1,o.src="https://static.woopra.com/js/w.js",(c=n.getElementsByTagName(a)[0]).parentNode.insertBefore(o,c)}("woopra");

woopra.config({
  domain: {Your Woopra Project Domain},
  outgoing_tracking: true,
  download_tracking: true,
  click_tracking: true
});

// Track Page views
analytics.subscribe('page_viewed', (event) => {
  woopra.track('pv', {
    title: event.context.document.title,
    url: event.context.document.location.pathname,
    uri: event.context.document.location.href
  })
});

analytics.subscribe('product_viewed', (event) => {

  woopra.track('product view', {
    title: event.data.productVariant.title,
    price: event.data.productVariant.price.amount,
    currency: event.data.productVariant.price.currencyCode,
    url: event.context.document.location.pathname,
    uri: event.context.document.location.href
  });
});

analytics.subscribe("clicked", event => {
  woopra.track('button click',  {
    href: event.data.element.href,
    text: event.data.element.name
  })
});

analytics.subscribe('cart_viewed', (event) => {
  woopra.track('cart view', {
    cost: event.data.cart.cost,
    quantity: event.data.cart.totalQuantity,
    lines: JSON.stringify(event.data.cart.lines),
    title: event.context.document.title,
    url: event.context.document.location.pathname,
    uri: event.context.document.location.href
  });
});

analytics.subscribe('checkout_contact_info_submitted', (event) => {
  const checkout = event.data.checkout;

  woopra.identify({
    email: checkout.email,
    phone: checkout.phone,
    shopify_id: checkout.clientId
  });

  woopra.track('checkout contact info submitted', {
    email: checkout.email,
    phone: checkout.phone,
    title: event.context.document.title,
    url: event.context.document.location.pathname,
    uri: event.context.document.location.href
  });
});

analytics.subscribe('checkout_address_info_submitted', (event) => {
  woopra.identify({
    email: event.data.checkout.email,
    name: event.data.checkout.shippingAddress.firstName + ' ' + event.data.checkout.shippingAddress.lastName
  });
  woopra.track('checkout address info submitted', {
    address1: event.data.checkout.billingAddress.address1,
    address2: event.data.checkout.billingAddress.address2,
    city: event.data.checkout.billingAddress.city,
    country: event.data.checkout.billingAddress.countryCode,
    state: event.data.checkout.billingAddress.provinceCode,
    zip: event.data.checkout.billingAddress.zip,
    total_tax: event.data.checkout.totalTax,
    total_price: event.data.checkout.totalPrice,
    title: event.context.document.title,
    url: event.context.document.location.pathname,
    uri: event.context.document.location.href
  });
});

analytics.subscribe('checkout_completed', event => {
  woopra.identify({
    email: event.data.checkout.email
  });

  woopra.track("checkout completed")
});
Setting up the Task
The Task is used to pull in selected data from Shopify. You can create a new Task if one wasn't added by navigating to the Task section under Data Loader.
- From there configure the Task by selecting the Order table. You will also select the data type as 'Track'.

Add any additional conditions if you want to limit the orders to a specific timeframe. Use the created_at timestamp to filter the data.
- Map User Event. First Map the order.email to "email" in Woopra.

- Name your event and add Event Properties. Important fields would be total_price, order_id, checkout_id. Also, add any additional fields that are important to you.

- Tag Visitor Properties. This is data about the user that you want to import. You can select any Visitor properties you'd like but be sure to add email.

- Select the Timestamp as created_at.

- Save, Preview, and Activate. The import will start to bring in records. This may take some time to complete depending on the amount of data.
Updated 8 months ago